Thursday, June 19, 2014

BBW Semi Annual Sale Haul

Well hello there everyone! Long time no talk. Sorry about that, that's definitely my fault. I've been spending my days working long hours (and baking in the sun on my days off) which hasn't left me too much time to blog. One of the reasons I've been so busy is because it is officially the Bath and Body Works Semi-Annual Sale. As an employee, it is simultaneously my favorite time of year and the bane of my existence (there's nothing like spending 2 hours putting together a table of handsoap!).

Lucky for me, I got to pick up some of my favorite products for super cheap! And lucky for you, I'm going to give you the inside scoop on what I got. 


For those of you who don't know, Semi-Annual Sale happens every year in January and June and if there's ever a time to shop at BBW those are the times to do it. Not only are there crazy discounts (75% off anyone?) but they also bring back discontinued products that aren't available during the regular year. I didn't stock up on too many of those, but I did find quite a few things to add to my growing collection.

(Note: I am not getting compensated for this post and I only used my employee discount on one product which is marked below. All opinions are my own!)

Forever Midnight Fragrance Mist // Forever Midnight Body Cream

How excited was I to see that the full size fragrance mist and the body cream in Forever Midnight were only $8?! So excited! The Forever Collection are the most expensive products in the store (and they are slightly higher quality) but for me it's hard to justify a full priced purchase. The Forever Midnight is definitely a stronger fragrance and I know a lot of people feel it's more night time appropriate because it's more of a traditional perfume. It's vanilla orchid, plum nectar, and carmel liquor which I absolutely love and it wears really nicely on my skin. If you like Twilight Woods try this!

Oahu Coconut Shower Gel // Cashmere Glow Shower Gel

Our shower gels are my latest obsession, and when they're knocked down to the same price as what I normally buy for drug store body washes, how can I say no? (Answer: I can't). So I picked up the Oahu Coconut Shower Gel which is coconut scented but also has bergamot and lily notes in it, so it's a bit floral. I also grabbed the Cashmere Glow Shower Gel which I'll probably save for winter time since it's a bit warmer of a scent made up of peaches and vanilla.

Ever since I've been pairing the shower gels with the loofah my life has changed. The lather is phenomenal, which unleashes the fragrance and it fills my whole bathroom which is awesome! Not to mention the loofah lathers so much better than a wash cloth so I get to 3 times as much use out of the bottle (a broke girl's dream!).

Endless Weekend Body Scrub // Apricot and White Tea Face Scrub

These two products I'm a little less familiar with. The company came out with the Endless Weekend Body Scrub while I was away at school, but I got to try a few other of the pink sand scrubs when I worked over spring break. I've played around with this product a little bit in the store and I did use it earlier this week in the shower and let me tell you, I'm obsessed. The pink sand in the scrub is a great exfoliant because unlike sugar, it doesn't dissolve when it hits the water. For someone with really dry legs (me) it's just what the doctor ordered. This product is currently full price so I was able to apply my employee discount to it, but I totally would have bought it anyway.

The Apricot and White Tea Face scrub is something that I've only used once BUT it comes highly recommended from my coworkers who practically forced it into my bag when they heard I'd never used it. I'm planning on using it twice  a week as a gentle exfoliant and hopefully it will help keep my skin soft and clear. Unfortunately you can't get it online, but if you can find it in your local store I think it's worth giving it a try!


Do you have any Bath and Body Works favorites? Did you stock up during this month's sale? Let me know in the comments!


Friday, June 6, 2014

DIY: Glitter Wine Bottle

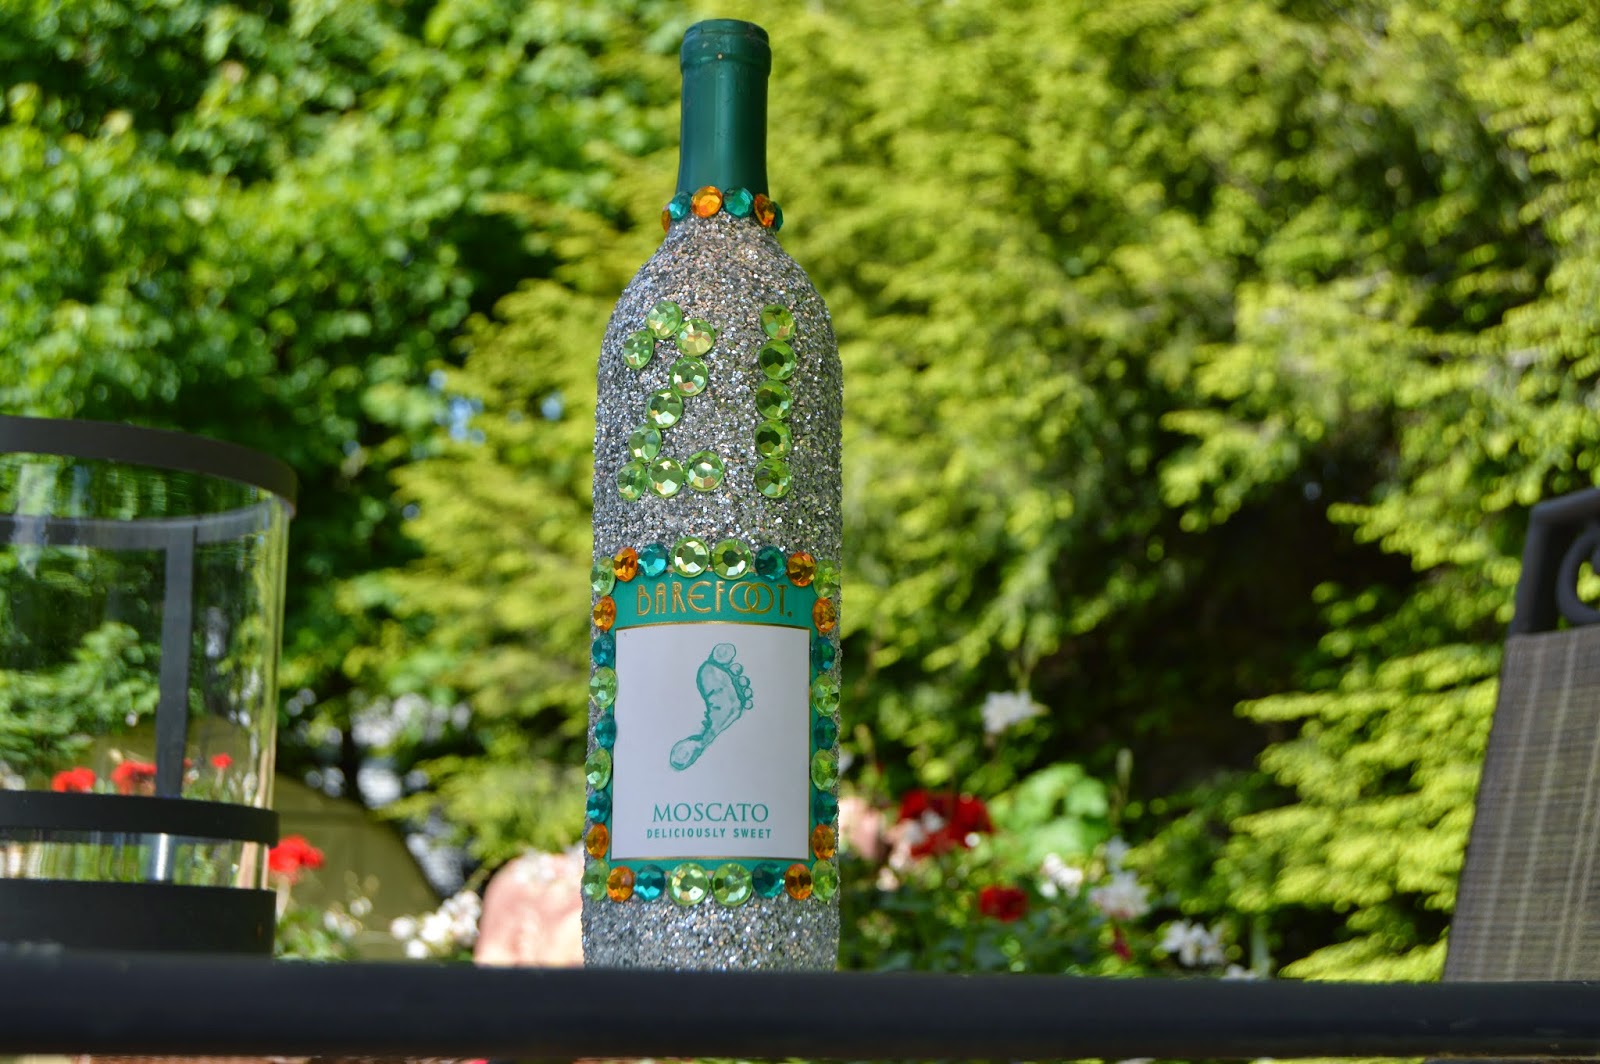
Hello friends! It was an exciting week for me as one of my besties turned 21 on Tuesday! And what do you give the ultimate girly girl for her 21st? A bling-ed out wine bottle of course! I had so much fun making this and now I'm constantly looking for things I can add glitter to because I have sooooooo much extra glitter. It was easy to make and my friend absolutely loved it, so it was time well spent!


I'm very proud of the finished product, but it obviously didn't start out looking like that! I have the project supplies are listed and pictured below. I overestimated how much glitter/mod podge I needed so I could have downsized and saved some money, but all the supplies came it at about $20 (excluding the wine)


Supplies
An item to decorate (I chose a wine bottle)
Glitter
Mod Podge Glossy Finish
Sponge Applicator
Gems (optional)
Tacky Glue (optional/not shown)


My sister got some action shots of me applying the glitter, so hopefully this gives you a good visual of what I was doing. It was a pretty simply method if I'm being honest. I worked in sections and applied a medium layer of mod podge and then just sprinkled the glitter over it using my fingers. 

I didn't want to gloop on the mod podge but I wanted enough so that the glitter would actually stick. I think after a section or two you get a feel for what is the ideal amount. I also think it would have been easier if I had gone for a smaller sponged applicator. I thought it would be more convenient to have  large one to cover more surface area at once, but it didn't quite fit in the jar of mod podge so it kind of created a big gluey mess.


After I sprinkled the glitter on the bottle, I shook it and blew on it so that all the extra glitter would flake off. I worked over newspaper but I still made quite the mess! Although I will say that the shape of the bottle made it pretty easy to work with since I had something to hold onto that wasn't being coated.


After you finish covering all the areas with glitter, you can use the mod podge to seal the glitter so it doesn't flake off. It is very important that you choose the mod podge with the glossy finish for this because it will preserve the shininess of the glitter. I just used the sponge to kind of blot/stipple it on top of the glitter (I figured this was more gentle than stroking it on) and it dried clear and kept the glitter in place!

It's also important to note that mod podge is not just regular glue. I don't believe using craft glue (especially as the sealing layer) would have the same effect.

The picture above is what the bottle looked like after I sealed in all of the glitter.


Now comes some more optional decorating! If I had been doing something for my home (like a vase or a make-up brush holder) I might not have gone for the gems, but 21st birthdays call for tackiness. 

I went for clear tacky glue because I didn't want any residue when it dried. It worked out really well and all of the gems stayed on during transport. I would say be a little more generous with the glue than you think you do (especially if it's going to dry clear anyway) because the glitter is a textured surface and it really needs to seep into all the nooks and crannies. 


What do you think of the project? What should I add glitter to next? Let me know in the comments!


Tuesday, June 3, 2014

Top 5 Tuesday: Summer Nail Polishes

I can't lie to you, if I was a rich woman (and hopefully someday I will be!)  a bi-weekly mani/pedi would definitely be a must in my life. But for right now, a trip to the nail salon is a pretty infrequent occurrence in the life of Elise and I am left to fend for myself when it comes to nail polish. Doing nails on a budget doesn't mean you can't have awesome colors! So for this Top 5 Tuesday I thought I'd share my favorite nail polish colors for summer from the drug store.

Colors listed from left to right! But other than that they're in no particular order.
1) Funky Fingers- Mrs. Mint
 I purchased this color from Five Below which is essentially a "dollar store" where everything is under $5. I love this color though! I don't really go for blue/green toned polishes very often, so it says a lot that I reach for this one. It's got good color pay off and who doesn't love mint for spring and summer?

2) Sinful Colors- 24/7
I got this color from Target for $1.99. This line is kind of hit or miss for me. This particular polish dries with a matte finish which isn't my favorite, but others in the line dry glossy. I just do two coats and add a top coat over it and it comes out fine. It's not the best quality (but hey, you get what you pay for!) but the color is pretty unique. I don't think the camera actually does it justice, but it is literally the most neon of pinks I have ever seen. And if you can tell from the swatches I chose, I love me some pink nail polish. 

3) Spoiled by Wet n Wild- Uh, As If!
I found this color at CVS Pharmacy and this was also $1.99. I was insanely impressed with this color, especially for the price. First off, let's just point out that the name is a Clueless reference (for those of you who didn't know I was Cher Horowitz in a previous life) so it automatically gets points in my book. Next, the brush is super wide so it's really easy to get a nice smooth coat without much effort. And to top it all off the color payoff is great for such a cheap polish. You don't even need two coats if you don't want which is crazy! 

4) Sally Hansen Hard as Nails Xtreme Wear- Coral Reef
I think Sally Hansen polishes are pretty easy to get your hands on, but I got mine at CVS for $3.19. This is one of my go to colors for spring and summer. I did a whole blog post on it previously, but coral is something I can't get enough of! The formula is good and it dries with a really nice finish and it was definitely a good find.

5) Sally Hansen Hard as Nails- No Hard Feelings
Again, I got this one from CVS and I'm having trouble finding the price online for some reason, but it's still listed on the Sally Hansen website so I know they still make it! But anyways, this color is beautiful and I love that you really only need one coat, even though I usually deepen it up with a second one. My one complaint is that the brush is too thin, but I'll get over it because it's a perfect purple!


Okay so holding this pose so you can actually see all the nails is super hard! And now the swatches are from right to left.
And I added a top coat for this photo, but I don't know if the camera even really picks up the difference


And now it's time for me to rave about my favorite base coat/top coat combo. My boyfriend's sister used these on me and my $2 nail polish lasted just about a week with no chips. After that, I immediately went and tracked down my own set. The polishes came together and I got them for about $8 at CVS. I've never been crazy into top coats and base coats but I really like this set and I think it makes my nails look professionally done.

So let me know you're favorite nail polishes! I'm going to London in September and I can't wait to get my hands on some Barry M and Tanya Burr colors. Any suggestions from my European readers?